Configuration and Usage
User Profile Requirements and Permissions
To utilize the module, users must meet the following prerequisites:
- Possession of a Mobee license.
- Assignment of either the "Mobee User" or "Mobee Administrator" permission set.
- Enable User External Credentials Through User Profiles if needed.
Retrieve and Reset Document Generation Token
Open the Mobee Settings by navigating to the App Launcher and searching for Mobee Settings.
Click on "Mobee Settings" in the "Items" section.

In Mobee Settings, navigate to the "Document Generation" tab.
Within the "Document Generation" tab, you will find Your Organization Token if your Organization is subscribed to the Mobee Document Generation service. Utilize this token to authorize your access to the document generation. You can click on the button to the left of the 'Reset Button' to copy the token to your clipboard or select and copy it.

If you need to reset the token, locate the "Reset Token" button on the right. Clicking this button will allow you to generate a new token for your Organization.

Note: Make sure to update the token in the Custom Headers when you reset it in the Mobee Settings.
Access Authorization
Mobee's document generation relies on an external service, making authorization vital for security. By employing Token authentication, only authenticated entities can access the service, eliminating the risk of unauthorized use and ensuring robust protection against data breaches.
Mobee Document Generator External Credential Setup
This section outlines a step-by-step guide on how to set up external credentials for Mobee Document Generator, including creating a custom authentication protocol, adding parameters, custom headers, and integrating with Uprizon for authentication.
Setup External Credentials
- Open the external credentials management interface by navigating to Setup > Security > Named Credentials.
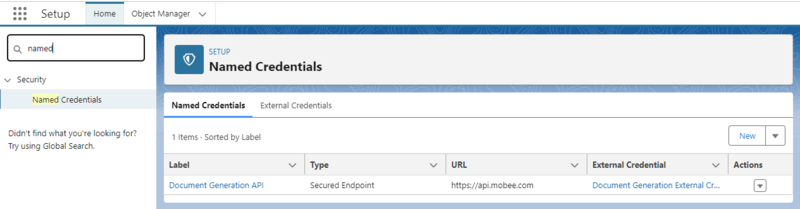
- Click on the "External Credentials" tab.
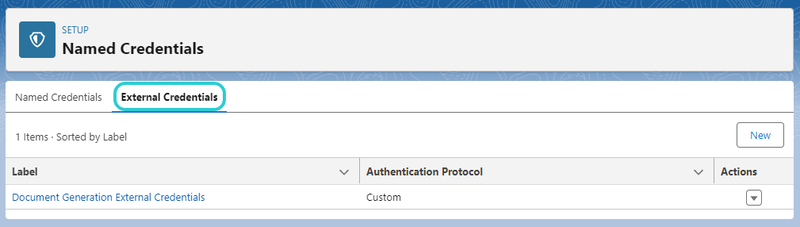
- Locate the external credential with the label "Document Generation External Credentials" and click on it.

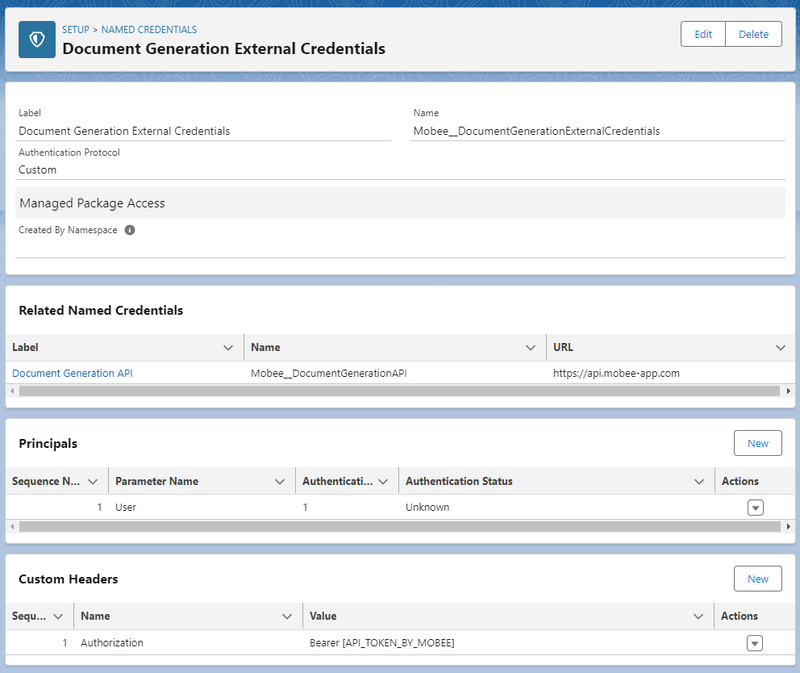
- In the "Document Generation External Credentials," find the Custom Headers with the Name "Authorization", click on the arrow on the right and select "Edit".


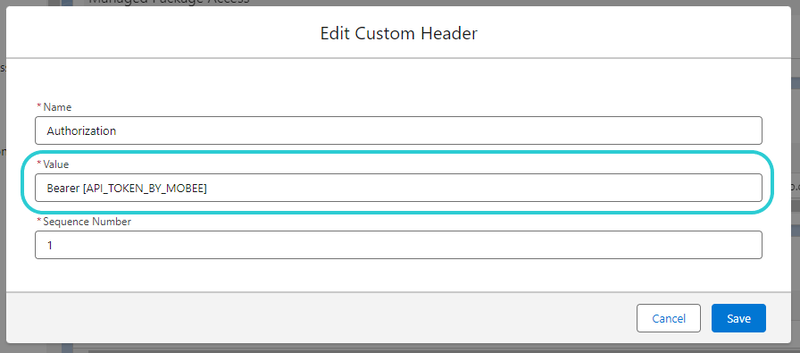
Inside the Custom Headers Window, Add The Token To The Custom Header:
Replace the Value by the token provided by in the Mobee Settings Page:
- Name: Authorization
- Value: Bearer [Token provided by Mobee]
Note: Before saving, ensure that the token has the "Bearer " prefix. If not, add the prefix with a trailing space at the end.
For example: If the token is
eyJhbGciOiJIUzI1NiIsInR5cCI6IkpXVCJ9.eyJzdWIiOiIxMjM0NTY3ODkwIiwibmFtZSI6IkpvaG4gRG9lIiwiaWF0IjoxNTE2MjM5MDIyfQ.SflKxwRJSMeKKF2QT4fwpMeJf36POk6yJV_adQssw5c, make it:Bearer eyJhbGciOiJIUzI1NiIsInR5cCI6IkpXVCJ9.eyJzdWIiOiIxMjM0NTY3ODkwIiwibmFtZSI6IkpvaG4gRG9lIiwiaWF0IjoxNTE2MjM5MDIyfQ.SflKxwRJSMeKKF2QT4fwpMeJf36POk6yJV_adQssw5cClick on "Save" to save the custom header.
Note: Make sure to update the token in the Custom Headers when you reset it in the Mobee Settings.
Creating a Document Template
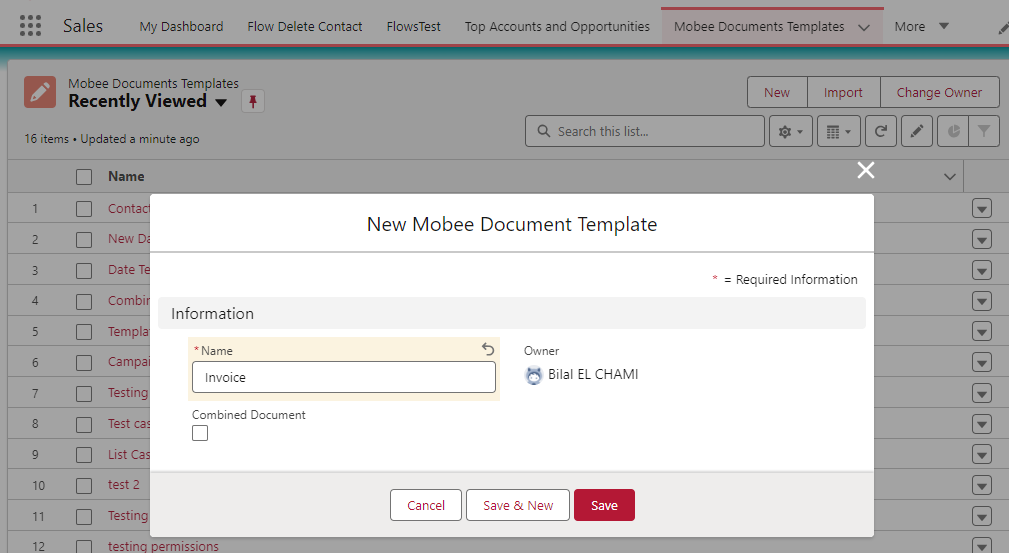
- Navigate to the Mobee Documents Templates Salesforce Tab to initiate the creation of a new template.
- Click on the "New" button and furnish a suitable name for the template.
After the successful creation of the template, the next step involves associating it with a specific Salesforce object. Follow the steps below:
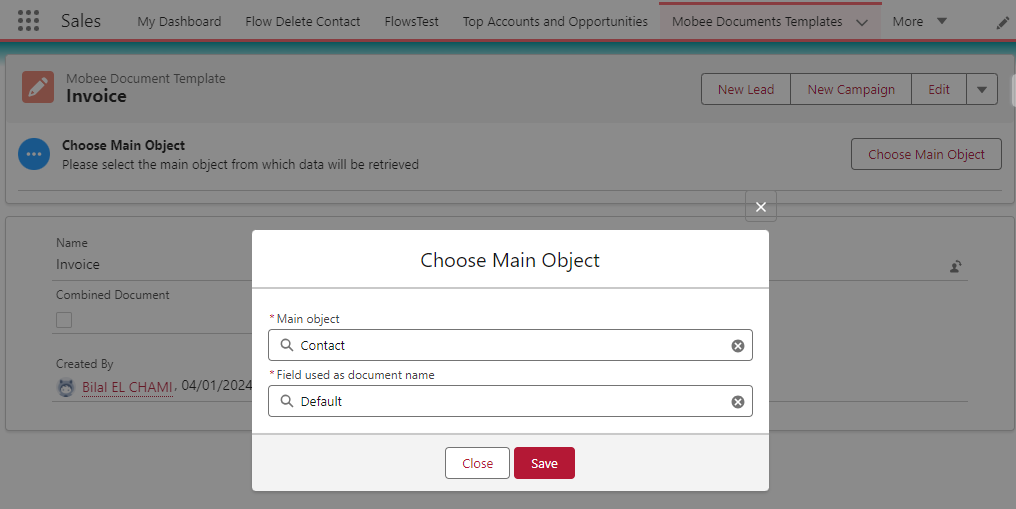
- Access the newly created template by selecting its name from the list.
- Within the initial section, click the "Choose Main Object" button located on the right.
- Utilize the lookup search field to designate the desired main object.
- Opt for a Salesforce field on the selected object to serve as the naming convention for the generated file. Supported types include text fields and formulas. The Name field is selected by default.
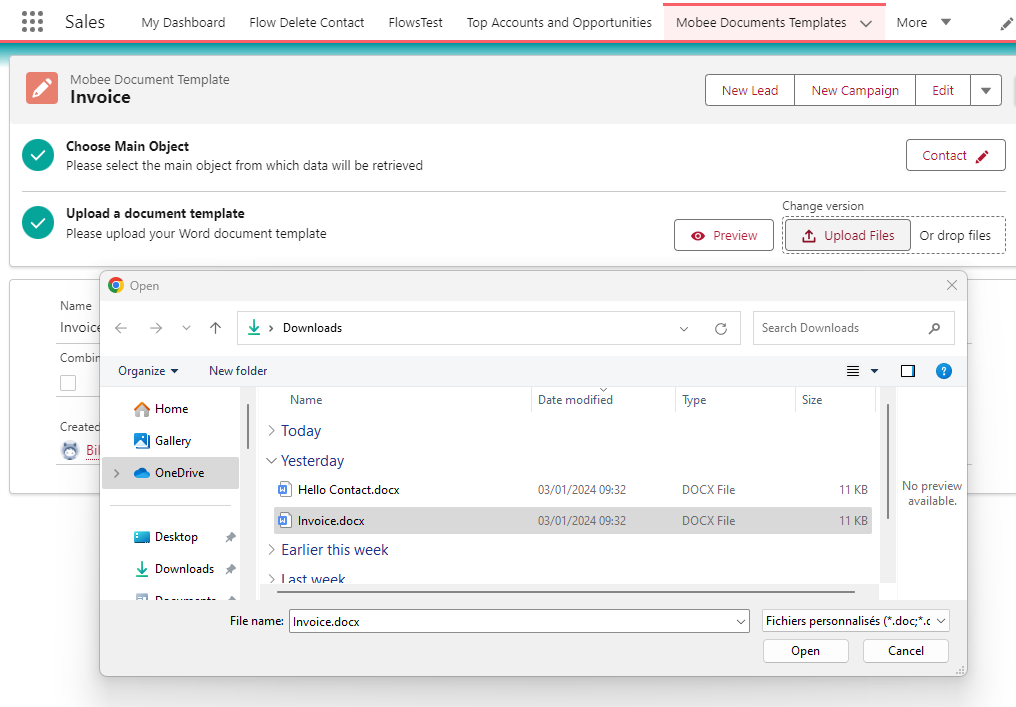
- After the selection of the main object and naming field, proceed to upload your Word document template by selecting the "Upload" button. Please note that only files with the
.docxextension are supported.
Generate Documents from Template
Mobee offers a range of options to facilitate document generation tailored to your specific requirements. The package encompasses pre-built components ready for immediate use, seamlessly integratable into your pages. Moreover, Mobee provides functionalities allowing you to customize your entire document generation processes using Lightning or even Apex.
Lightning Web Component
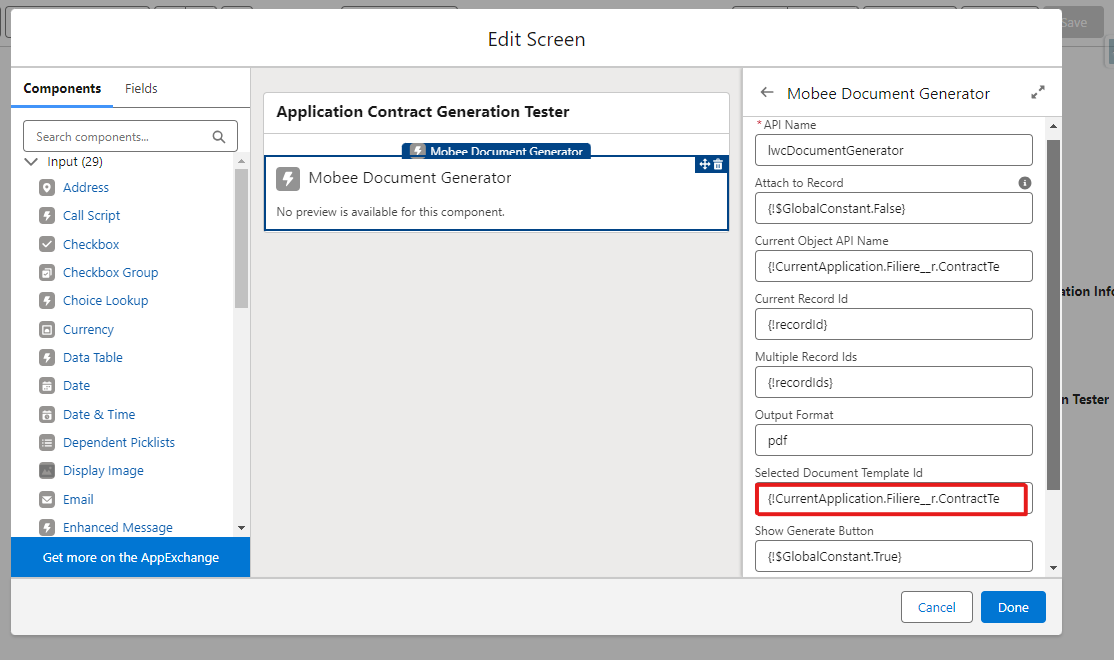
For manual document generation within a screen, Mobee presents a fundamental Lightning Web Component designed to generate documents for the current record based on a specified template ID.
Below are the component parameters:
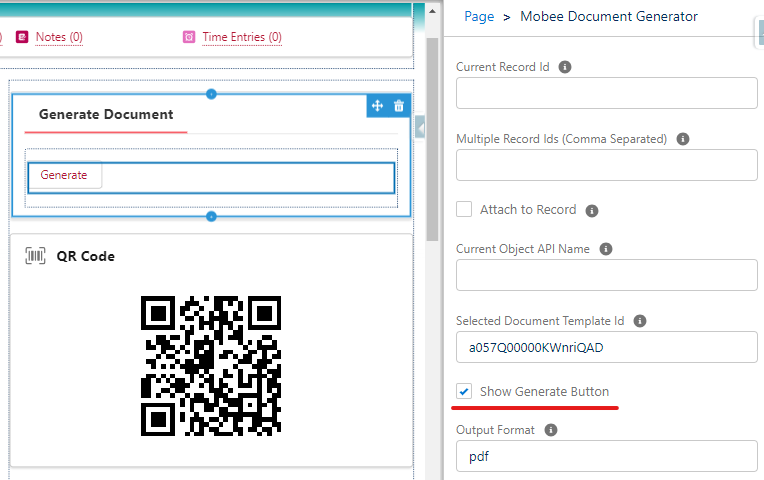
Current Record Id: When placed on a record page, this parameter can be left empty, as it automatically detects the ID of the current record.
Multiple Record Ids (Comma Separated): This parameter can be left empty when generating unitary documents and will be used for combined document templates later.
Attach to Record: A flag indicating whether the user wishes to attach the generated document to the Notes & Attachments of the current record. If unchecked, the document will be automatically downloaded.
Current Object API Name: When placed on a record page, this parameter can be left empty, as it automatically detects the object API Name of the current record.
Selected Template Id: Informs the component about the template to be used for the generation.
Show Generate Button: A flag indicating whether a physical button is desired to trigger the generation. If unchecked, document generation will be triggered upon loading the page containing the component.
Output Format: This parameter indicates the desired format for the generated file. Mobee currently supports
docxandpdf.
Usage:
This component is suitable for use in both "Record Lightning Pages" and "Flow Screens." To harness the full capabilities of this component, it is recommended to use it in Flow Screens. Leveraging Flow's flexibility enables dynamic fetching of the desired template based on specific search criteria, providing a dynamic parameter to the component, and avoiding the inclusion of parameters in hard text.
Here's an example of its usage in a Screen Flow.
Action Button
The Mobee package seamlessly integrates with Salesforce record pages, providing an out-of-the-box Flow that can be effortlessly added as an action button.
Creating the Action Button:
- Navigate to the object manager and select the object where you want the generation button to be available.
- Go to the "Buttons, Links, and Actions" section and click on the "New Action" button.
- Choose the "Lightning Web Component" option for the "Action Type," and select "Mobee:documentGeneratorAction" for the "Lightning Web Component."

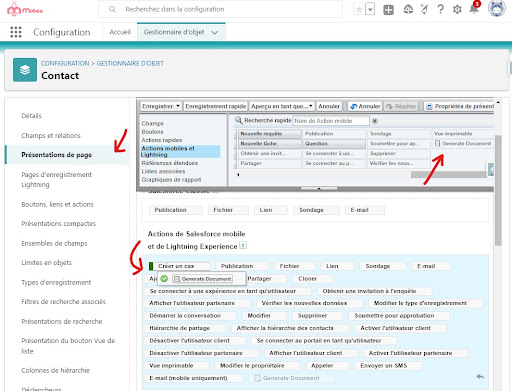
Adding the Action Button to a Page Layout:
Once the action button is created, follow these steps to add it to a desired "Page Layout."
- Open the "Page Layouts" section from the object manager and select the desired page where you want to add your button.
- Locate your newly created button in the "Mobile & Lightning Actions" Section.
- Drag the button and drop it into the "Salesforce Mobile and Lightning Experience Action" section.
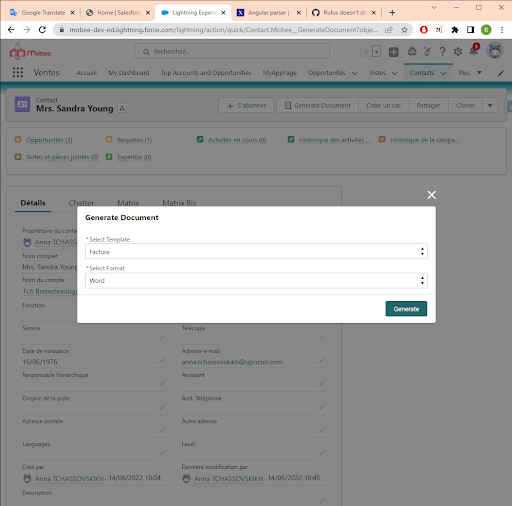
Utilizing the Added Button:
To utilize the added button, follow these steps:
- Navigate to a record of the same object type as the created document template.
- Click the "Generate Document" action button.
- Select the desired template from the provided selection list.
- The document will be generated and automatically downloaded.
List View Button
Similar to the aforementioned action button, Mobee extends its functionality by offering a Flow that can be invoked from list view buttons. This feature emphasizes the capability to generate documents for multiple records simultaneously.
Creating a List View Button:
Follow these steps to create the button:
- Prepare a template to be used on the desired main object.
- From the Setup screen, select the desired main object.
- Go to the "Buttons, Links, and Actions" section.
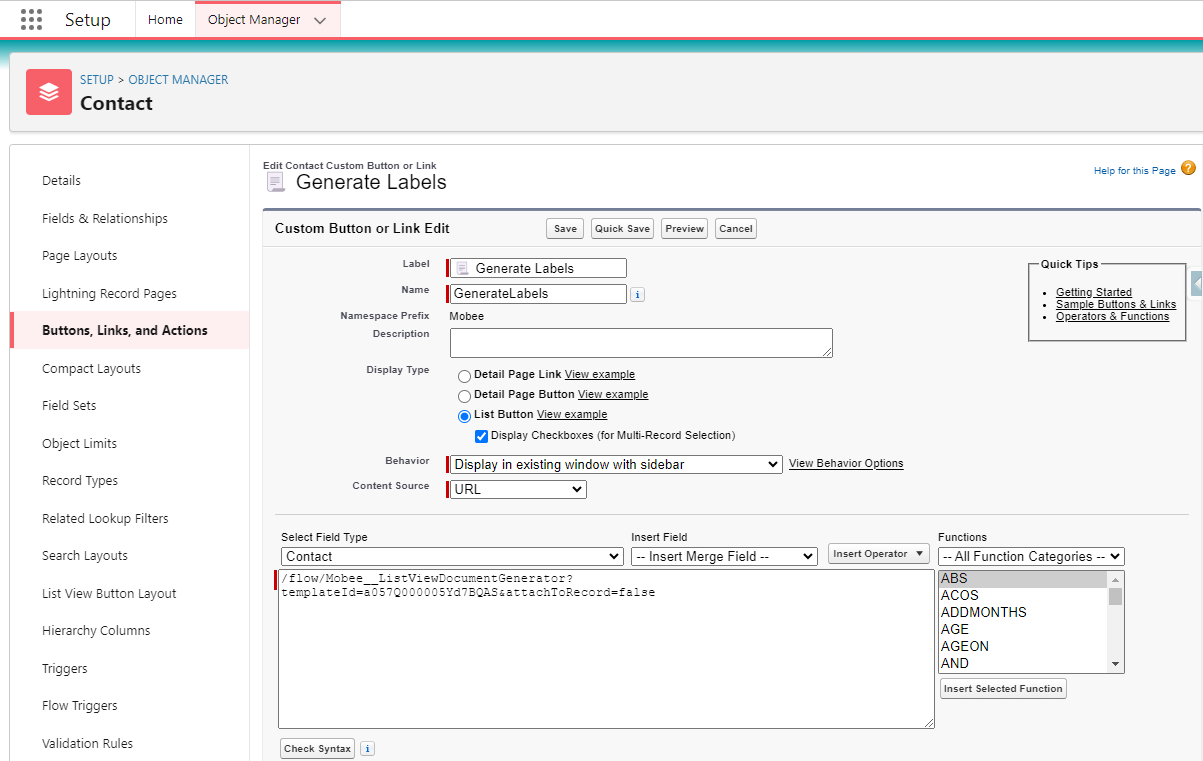
- Click on the top-right "New Button or Link" button.
- Complete the required Label and Name input fields.
- Select List Button from the "Display Type" and ensure that the "Display Checkboxes (for Multi-Record Selection)" option is checked.
- In the formula text area, input the following path and replace the template ID with your desired template:
/flow/Mobee__ListViewDocumentGenerator?templateId=a057Q000005Yd7BQAS&attachToRecord=false&outputFormat=pdf
Adding the Button to the List View:
To add the button to the list view, follow these steps:
- From the "Object Manager", access the "List View Button Layout" section.
- For the list view layout, click the dropdown button on the right and select "Edit."
- In the List View Editor, find your button in the "Custom Buttons" section and add it to the Selected Buttons List.
- Click on Save.
Utilizing the Added Button:
To utilize the list view button, follow these steps:
- Go to the object list view.
- Select your desired records by clicking on the checkbox on each line.
- Locate your button in the button list in the top actions section.
- Click on the button, which will open the flow in a new page and generate the documents.
Note: This "Custom Button" can also be used for Related List Views.
Apex Client
Document generation is not always a user-triggered functionality; at times, there's a need to generate documents from triggers, jobs, and other automated processes. To facilitate this, Mobee provides an Apex function that enables seamless document generation tailored to specific requirements.
The function is accessible within the Mobee package by invoking the Mobee.DocumentTemplaterController.generateDocuments function.
Similar to the Lightning Web Component, this Apex function takes four parameters as input:
- A list of Salesforce record IDs for which documents need to be generated. (It can be a list containing a single ID)
- The Mobee Document Template ID to be used as the template for the generation.
- The desired output format (
docxorpdf). - A flag indicating whether to attach the generated file to the given record.
This function returns a Map containing the generated file as Blob indexed by their respective record IDs.
Here's an example of utilizing this Apex function:
Context: In this example, the Mobee Template Main Object is the Application__c custom object, and the template Id is stored in the ContractTemplate__c lookup field, which is on the parent field Sector__c.
public class DocumentGeneration {
    @Future(callout=true)
    public static void generateContract(String applicationId) {
        String OUTPUT_FORMAT = 'pdf';
        Application__c application = [SELECT Id, Sector__c.ContractTemplate__c FROM Application__c WHERE Id = :applicationId];
        if (application.Sector__c.ContractTemplate__c == null) {
            throw new Mobee.DocumentGenerationException('Template is not defined on this Sector.');
        }
        Map<Id, Blob> generatedDocuments;
        if (Test.isRunningTest()) {
            generatedDocuments = generateDocumentMock(new List<Id>{applicationId});
        } else {
            generatedDocuments = Mobee.DocumentTemplaterController.generateDocuments(
                // recordsIds
                new List<String>{applicationId},
                // templateId
                application.Sector__c.ContractTemplate__c,
                // outputFormat
                OUTPUT_FORMAT,
                // attachToRecords
                false);
        }
        Blob generatedDocument = generatedDocuments.get(applicationId);
        if (generatedDocument == null) {
            throw new Mobee.DocumentGenerationException('Error while generating document.');
        }
        // Do whatever you want with the Blob...
    }
}
Compress PDF
Mobee provides a feature to compress PDF files, helping to reduce their size. Users can provide either a local file path or a URL to a PDF file, which will then be downloaded and compressed.
Usage
Input Parameters
- File Path or URL: The location of the PDF file to be compressed, either as a local path or an online URL.
- Color Image Resolution (default: 120 DPI): Sets the resolution of color images within the PDF. Higher values provide better image quality but result in larger file sizes.
- Grayscale Image Resolution (default: 120 DPI): Controls the resolution of grayscale images, which contain shades of gray but no color. Adjusting this setting affects the clarity of grayscale images.
- Monochrome Image Resolution (default: 120 DPI): Specifies the resolution for monochrome (black and white) images in the PDF. This impacts the sharpness of text and line art.
Important Notes:
- The default resolution for all image types is set to 120 DPI.
- Higher resolution settings increase image quality but also enlarge the file size.
- Adjust the resolution settings based on your balance between image quality and file size.
Apex Client
PDF compression isn't always triggered manually by users. Sometimes, automated processes such as triggers or scheduled jobs need to compress documents. To support these scenarios, Mobee provides an Apex function that allows seamless document compression tailored to specific needs.
The function is available in the Mobee package through Mobee.DocumentsApiClient.compressDocument.
This Apex function requires four input parameters:
- A list of Salesforce record IDs for the documents to be compressed (or a single URL).
- Color Image Resolution.
- Grayscale Image Resolution.
- Monochrome Image Resolution.
Example Use Case:
In the following example, the document to be compressed is identified by its Salesforce record ID or URL.
/**
 * @description This class provides functionality to compress PDF invoice files
 * before saving them to Salesforce.
 *
 * @usage Compresses the given PDF blob using specified compression options
 * and saves the compressed version via InvoiceController.
 */
public with sharing class InvoiceController {

    /**
     * @description Compresses a given PDF invoice blob using predefined settings
     * to reduce file size while maintaining readability.
     *
     * @param invoicePdfBlob The original PDF invoice file in Blob format.
     *
     * @throws IllegalArgumentException If the provided blob is null or empty.
     *
     * @example
     * Blob pdfBlob = [SELECT Body FROM ContentVersion WHERE Title = 'SampleInvoice'].Body;
     * InvoiceController.compressInvoice(pdfBlob);
     */
    public static void compressInvoice(Blob invoicePdfBlob) {
        if (invoicePdfBlob == null || invoicePdfBlob.size() == 0) {
            throw new IllegalArgumentException('The invoice PDF blob cannot be null or empty.');
        }

        // Define compression settings
        Map<String, String> compressionOptions = new Map<String, String>{
            'ColorImageResolution' => '72',  // Set color image resolution to 72 DPI
            'GrayImageResolution'  => '72',  // Set grayscale image resolution to 72 DPI
            'MonoImageResolution'  => '72'   // Set monochrome image resolution to 72 DPI
        };

        try {
            Blob compressedInvoice = DocumentsApiClient.compressDocument(invoicePdfBlob, compressionOptions);
            InvoiceController.saveInvoice(compressedInvoice);
            System.debug('Invoice successfully compressed and saved.');
        } catch (Exception ex) {
            System.debug('Error during compression: ' + ex.getMessage());
            throw new AuraHandledException('Failed to compress the invoice: ' + ex.getMessage());
        }
    }
}
This example demonstrates how to efficiently compress and store PDF invoices in Salesforce while maintaining an optimal balance between quality and file size.